

参考:
Helm 产生原因
利用 k8s 部署一个应用,需要 k8s 原生资源文件如 deployment、replicaSet、service 或 pod 等。而对于一个复杂的应用,会有很多类似上面的资源描述文件,如果有更新或回滚应用的需求,可能要修改和维护所涉及的大量资源文件,且由于缺少对发布过的应用版本管理和控制,使 k8s 上的应用维护和更新等面临诸多的挑战,而 Helm 可以帮我们解决这些问题。
Helm 是什么
Helm 把 k8s 资源(比如 deployments、services 或 ingress 等)打包到一个 chart 中,而 chart 被保存到 chart 仓库。通过 chart 仓库 可用来存储和分享 chart。Helm 使发布可配置,支持发布应用配置的版本管理,简化了 k8s 部署应用的版本控制、打包、发布、删除、更新等操作。
做为 k8s 的一个包管理工具,Helm 具有如下功能:
- 创建新的 chart
- chart 打包成 tgz 格式
- 上传 chart 到 chart 仓库或从仓库中下载 chart
- 在 k8s 集群中安装或卸载 chart
- 管理用 Helm 安装的 chart 的发布周期
Helm 结构
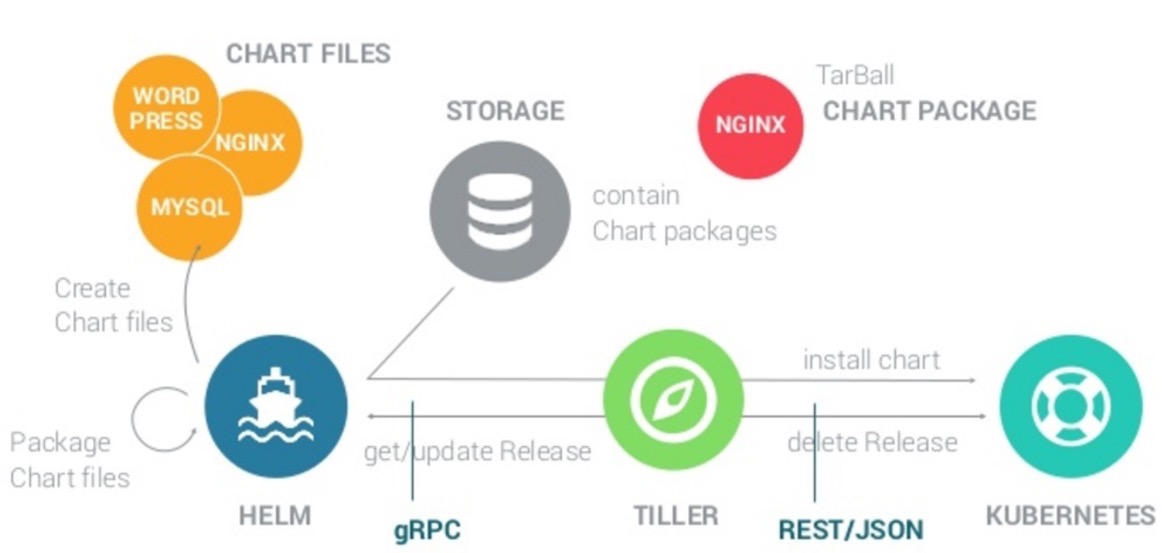
Helm 有三个重要概念
- chart:包含了创建 k8s 的一个应用实例的必要信息
- config:包含了应用发布配置信息
- release:是一个 chart 及其配置的一个运行实例
Helm 由以下两个组成部分
Helm Client 是用户命令行工具,其主要负责如下:
- 本地 chart 开发
- 仓库管理
- 与 Tiller sever 交互
- 发送预安装的 chart
- 查询 release 信息
- 要求升级或卸载已存在的 release
Tiller Server 是一个部署在 k8s 集群内部的 server,其与 Helm client、apiserver 进行交互。Tiller server 主要负责如下:
- 监听来自 Helm client 的请求
- 通过 chart 及其配置构建一次发布
- 安装 chart 到 k8s 集群,并跟踪随后的发布
- 通过与 k8s 交互升级或卸载 chart
简单的说,client 管理 charts,而 server 管理发布 release。
Helm 的实现
Helm client
- Helm client 采用 go 语言编写,采用 gRPC 协议与 Tiller server 交互。
Helm server
- Tiller server 也同样采用 go 语言编写,提供了 gRPC server 与 client 进行交互,利用 Kubernetes client 库与 Kubernetes 进行通信,当前库使用了 REST+JSON 格式。
- Tiller server 没有自己的数据库,目前使用 Kubernetes 的 ConfigMaps 存储相关信息。
说明:配置文件尽可能使用YAM格式。
基于 RBAC 安装 Helm
https://helm.sh/docs/chart_best_practices/rbac/
在 k8s 中,最佳的做法是,为特定的应用程序的服务帐户授予角色,确保应用程序在指定的范围内运行。因此这里选择使用 RBAC 权限控制的方式安装。
下面使用的 helm 客户端包和 tiller 服务端镜像,如果你下载不了,可以从这里获取:
链接:https://pan.baidu.com/s/1m_1jwbZbsazB6oOSjAXFBg
提取码:2mqv版本:helm-v2.13.1
安装 Helm 客户端
可以参考:https://helm.sh/docs/intro/install/
下载客户端包:
可以从这里查找所有版本:https://github.com/helm/helm/releases
[root@k8s-master01 helm]# pwd
/usr/local/install-k8s/plugin/helm

[root@k8s-master01 helm]# wget https://get.helm.sh/helm-v2.13.1-linux-amd64.tar.gz
[root@k8s-master01 helm]# tar -zxvf helm-v2.13.1-linux-amd64.tar.gz.tar
linux-amd64/
linux-amd64/LICENSE
linux-amd64/tiller
linux-amd64/helm
linux-amd64/README.md

[root@k8s-master01 helm]# ls
helm-v2.13.1-linux-amd64.tar.gz.tar  linux-amd64

[root@k8s-master01 helm]# cp ./linux-amd64/helm /usr/local/bin/
安装 TIller 服务端
rbac.yaml:
apiVersion: v1
kind: ServiceAccount
metadata:
  name: tiller
  namespace: kube-system
---
apiVersion: rbac.authorization.k8s.io/v1beta1
kind: ClusterRoleBinding
metadata:
  name: tiller
roleRef:
  apiGroup: rbac.authorization.k8s.io
  kind: ClusterRole
  name: cluster-admin
subjects:
  - kind: ServiceAccount
    name: tiller
    namespace: kube-system
创建资源并初始化:
[root@k8s-master01 helm]# kubectl create -f rbac.yaml
serviceaccount/tiller created
clusterrolebinding.rbac.authorization.k8s.io/tiller created

[root@k8s-master01 helm]# helm init --service-account tiller
Creating /root/.helm/repository/repositories.yaml
Adding stable repo with URL: https://kubernetes-charts.storage.googleapis.com

[root@k8s-master01 helm]# helm init --service-account tiller --skip-refresh
......
Creating /root/.helm/repository/repositories.yaml
Adding stable repo with URL: https://kubernetes-charts.storage.googleapis.com
Adding local repo with URL: http://127.0.0.1:8879/charts
$HELM_HOME has been configured at /root/.helm.

Tiller (the Helm server-side component) has been installed into your Kubernetes Cluster.

Please note: by default, Tiller is deployed with an insecure 'allow unauthenticated users' policy.
To prevent this, run `helm init` with the --tiller-tls-verify flag.
For more information on securing your installation see: https://docs.helm.sh/using_helm/#securing-your-helm-installation
Happy Helming!
查看 tiller 的 pod :
[root@k8s-master01 helm]# kubectl get pod -n kube-system
NAME                                   READY   STATUS         RESTARTS   AGE
coredns-5c98db65d4-8srwz               1/1     Running        15         23d
coredns-5c98db65d4-m7tvx               1/1     Running        14         23d
etcd-k8s-master01                      1/1     Running        56         23d
kube-apiserver-k8s-master01            1/1     Running        57         23d
kube-controller-manager-k8s-master01   1/1     Running        15         23d
kube-flannel-ds-amd64-6shbj            1/1     Running        13         23d
kube-flannel-ds-amd64-lchhp            1/1     Running        17         23d
kube-flannel-ds-amd64-wc8sr            1/1     Running        15         23d
kube-proxy-5cjjr                       1/1     Running        13         23d
kube-proxy-l6gjp                       1/1     Running        13         23d
kube-proxy-w9zds                       1/1     Running        13         23d
kube-scheduler-k8s-master01            1/1     Running        15         23d
tiller-deploy-58565b5464-g262f         0/1     ErrImagePull   0          98s

[root@k8s-master01 helm]# kubectl describe pod tiller-deploy-58565b5464-g262f -n kube-system
......
Events:
  Type     Reason     Age                 From                 Message
  ----     ------     ----                ----                 -------
  Normal   Scheduled  2m7s                default-scheduler    Successfully assigned kube-system/tiller-deploy-58565b5464-g262f to k8s-node02
  Normal   Pulling    58s (x3 over 2m4s)  kubelet, k8s-node02  Pulling image "gcr.io/kubernetes-helm/tiller:v2.13.1"
  Warning  Failed     43s (x3 over 109s)  kubelet, k8s-node02  Failed to pull image "gcr.io/kubernetes-helm/tiller:v2.13.1": rpc error: code = Unknown desc = Error response from daemon: Get https://gcr.io/v2/: net/http: request canceled while waiting for connection (Client.Timeout exceeded while awaiting headers)
  Warning  Failed     43s (x3 over 109s)  kubelet, k8s-node02  Error: ErrImagePull
  Normal   BackOff    14s (x4 over 108s)  kubelet, k8s-node02  Back-off pulling image "gcr.io/kubernetes-helm/tiller:v2.13.1"
  Warning  Failed     14s (x4 over 108s)  kubelet, k8s-node02  Error: ImagePullBackOff
通过查看 pod 信息知道下载镜像失败,这时可以通过其它方式将镜像下载好,并将镜像导入到集群中所有节点,然后重新创建 pod:
[root@k8s-master01 helm]# kubectl delete pod tiller-deploy-58565b5464-g262f -n kube-system
pod "tiller-deploy-58565b5464-g262f" deleted

[root@k8s-master01 helm]# kubectl get pod -n kube-system
NAME                                   READY   STATUS    RESTARTS   AGE
coredns-5c98db65d4-8srwz               1/1     Running   15         23d
coredns-5c98db65d4-m7tvx               1/1     Running   14         23d
etcd-k8s-master01                      1/1     Running   56         23d
kube-apiserver-k8s-master01            1/1     Running   57         23d
kube-controller-manager-k8s-master01   1/1     Running   15         23d
kube-flannel-ds-amd64-6shbj            1/1     Running   13         23d
kube-flannel-ds-amd64-lchhp            1/1     Running   17         23d
kube-flannel-ds-amd64-wc8sr            1/1     Running   15         23d
kube-proxy-5cjjr                       1/1     Running   13         23d
kube-proxy-l6gjp                       1/1     Running   13         23d
kube-proxy-w9zds                       1/1     Running   13         23d
kube-scheduler-k8s-master01            1/1     Running   15         23d
tiller-deploy-58565b5464-8l6p6         1/1     Running   0          8s
查看 helm 版本
在 helm 客户端和 tiller 服务端都安装好之后,可以查看版本验证是否安装正确:
[root@k8s-master01 helm]# helm version
Client: &version.Version{SemVer:"v2.13.1", GitCommit:"618447cbf203d147601b4b9bd7f8c37a5d39fbb4", GitTreeState:"clean"}
Server: &version.Version{SemVer:"v2.13.1", GitCommit:"618447cbf203d147601b4b9bd7f8c37a5d39fbb4", GitTreeState:"clean"}
如果出现类似以上信息,证明安装成功。
Helm 模板
我们上面提到过,Helm 把 k8s 资源(比如 deployments、services 或 ingress 等)打包到一个 chart 中,而 chart 被保存到 chart 仓库。通过chart 仓库可用来存储和分享 chart。
如果我们要在 k8s 集群中运行某个服务,可直接从仓库中下载对应的 chart 并运行即可。
比如 redis:
https://hub.helm.sh/charts/bitnami/redis
helm repo add bitnami https://charts.bitnami.com/bitnami
helm install bitnami/redis --version 10.6.5
Helm 自定义模板
自定义模板一般会用到 Chart.yaml、values.yaml 和 templates 文件夹,其中:
- Chart.yaml:必需。声明一个 Helm 模板,必须要有 name 和 version 两个属性,其值可以自定义。
- templates 文件夹:必需。存放资源清单,比如 deployment.yaml、service.yaml 等等。运行 helm 就是为我们创建这里定义的资源。
- valuse.yaml:可选。为资源清单提供可配置的 key - value 数据。
Chart.yaml
name: my-template
version: 1.0
values.yaml
image:
  repository: hub.xixihaha.com/library/mynginx
  tag: v1
注意:在 values.yaml 中的值可以被部署 release 时用到的参数 --values yaml_file_path 或者 --set key1=value1, key2=value2 覆盖掉。
比如:
helm install --set image.tag=v2 .
templates 下的 deployment.yaml
apiVersion: extensions/v1beta1
kind: Deployment
metadata:
  name: deployment-nginx
spec:
  replicas: 3
  template:
    metadata:
      labels:
        app: nginx-app
    spec:
      containers:
      - name: nginx-container
        image: {{ .Values.image.repository }}:{{ .Values.image.tag }}
        ports:
        - containerPort: 80
templates 下的 svc.yaml
apiVersion: v1
kind: Service
metadata:
  name: svc-nginx
spec:
  type: NodePort
  selector:
    app: nginx-app
  ports:
  - name: http
    port: 80
    targetPort: 80
    nodePort: 31234
文件结构为:
[root@k8s-master01 myHelm]# pwd
/usr/local/install-k8s/plugin/helm/myHelm

[root@k8s-master01 myHelm]# ls
Chart.yaml  templates  values.yaml

[root@k8s-master01 myHelm]# cd templates/

[root@k8s-master01 templates]# ls
deployment.yaml  svc.yaml
常用命令
helm help 查看相关命令
[root@k8s-master01 myHelm]# helm help
The Kubernetes package manager

To begin working with Helm, run the 'helm init' command:

	$ helm init

This will install Tiller to your running Kubernetes cluster.
It will also set up any necessary local configuration.

Common actions from this point include:

- helm search:    search for charts
- helm fetch:     download a chart to your local directory to view
- helm install:   upload the chart to Kubernetes
- helm list:      list releases of charts

Environment:
  $HELM_HOME           set an alternative location for Helm files. By default, these are stored in ~/.helm
  $HELM_HOST           set an alternative Tiller host. The format is host:port
  $HELM_NO_PLUGINS     disable plugins. Set HELM_NO_PLUGINS=1 to disable plugins.
  $TILLER_NAMESPACE    set an alternative Tiller namespace (default "kube-system")
  $KUBECONFIG          set an alternative Kubernetes configuration file (default "~/.kube/config")
  $HELM_TLS_CA_CERT    path to TLS CA certificate used to verify the Helm client and Tiller server certificates (default "$HELM_HOME/ca.pem")
  $HELM_TLS_CERT       path to TLS client certificate file for authenticating to Tiller (default "$HELM_HOME/cert.pem")
  $HELM_TLS_KEY        path to TLS client key file for authenticating to Tiller (default "$HELM_HOME/key.pem")
  $HELM_TLS_ENABLE     enable TLS connection between Helm and Tiller (default "false")
  $HELM_TLS_VERIFY     enable TLS connection between Helm and Tiller and verify Tiller server certificate (default "false")
  $HELM_TLS_HOSTNAME   the hostname or IP address used to verify the Tiller server certificate (default "127.0.0.1")
  $HELM_KEY_PASSPHRASE set HELM_KEY_PASSPHRASE to the passphrase of your PGP private key. If set, you will not be prompted for
                       the passphrase while signing helm charts

Usage:
  helm [command]

Available Commands:
  completion  Generate autocompletions script for the specified shell (bash or zsh)
  create      create a new chart with the given name
  delete      given a release name, delete the release from Kubernetes
  dependency  manage a chart's dependencies
  fetch       download a chart from a repository and (optionally) unpack it in local directory
  get         download a named release
  help        Help about any command
  history     fetch release history
  home        displays the location of HELM_HOME
  init        initialize Helm on both client and server
  inspect     inspect a chart
  install     install a chart archive
  lint        examines a chart for possible issues
  list        list releases
  package     package a chart directory into a chart archive
  plugin      add, list, or remove Helm plugins
  repo        add, list, remove, update, and index chart repositories
  reset       uninstalls Tiller from a cluster
  rollback    roll back a release to a previous revision
  search      search for a keyword in charts
  serve       start a local http web server
  status      displays the status of the named release
  template    locally render templates
  test        test a release
  upgrade     upgrade a release
  verify      verify that a chart at the given path has been signed and is valid
  version     print the client/server version information

Flags:
      --debug                           enable verbose output
  -h, --help                            help for helm
      --home string                     location of your Helm config. Overrides $HELM_HOME (default "/root/.helm")
      --host string                     address of Tiller. Overrides $HELM_HOST
      --kube-context string             name of the kubeconfig context to use
      --kubeconfig string               absolute path to the kubeconfig file to use
      --tiller-connection-timeout int   the duration (in seconds) Helm will wait to establish a connection to tiller (default 300)
      --tiller-namespace string         namespace of Tiller (default "kube-system")

Use "helm [command] --help" for more information about a command.
运行一个 helm
[root@k8s-master01 myHelm]# pwd
/usr/local/install-k8s/plugin/helm/myHelm

# . 表示当前文件夹,一般来说应该在 Chart.yaml 所在文件夹执行命令
[root@k8s-master01 myHelm]# helm install .
NAME:   looming-seagull
LAST DEPLOYED: Sat Apr 11 17:53:15 2020
NAMESPACE: default
STATUS: DEPLOYED

RESOURCES:
==> v1/Pod(related)
NAME                               READY  STATUS             RESTARTS  AGE
deployment-nginx-7796b9c74d-ds7vb  0/1    ContainerCreating  0         0s
deployment-nginx-7796b9c74d-lsr8c  0/1    ContainerCreating  0         0s
deployment-nginx-7796b9c74d-tkdcm  0/1    ContainerCreating  0         0s

==> v1/Service
NAME       TYPE      CLUSTER-IP      EXTERNAL-IP  PORT(S)       AGE
svc-nginx  NodePort  10.104.206.163  <none>       80:31234/TCP  0s

==> v1beta1/Deployment
NAME              READY  UP-TO-DATE  AVAILABLE  AGE
deployment-nginx  0/3    3           0          0s
查看 helm
# 或者 helm ls
[root@k8s-master01 myHelm]# helm list
NAME            	REVISION	UPDATED                 	STATUS  	CHART        	APP VERSION	NAMESPACE
looming-seagull 	1       	Sat Apr 11 17:53:15 2020	DEPLOYED	my-template-1	           	default
注意:结果中的 name 是随机的字符串。
加上 --deleted 参数可以查看被标记为删除的 helm:
[root@k8s-master01 myHelm]# helm ls --deleted
NAME            	REVISION	UPDATED                 	STATUS 	CHART        	APP VERSION	NAMESPACE
modest-crocodile	1       	Sat Apr 11 17:51:42 2020	DELETED	my-template-1	           	default
查看 helm status
[root@k8s-master01 myHelm]# helm status looming-seagull
LAST DEPLOYED: Sat Apr 11 17:59:39 2020
NAMESPACE: default
STATUS: DEPLOYED

RESOURCES:
==> v1/Pod(related)
NAME                              READY  STATUS   RESTARTS  AGE
deployment-nginx-7796b9c74d-ds7vb  1/1    Running  0         9m45s
deployment-nginx-7796b9c74d-lsr8c  1/1    Running  0         9m45s
deployment-nginx-7796b9c74d-tkdcm  1/1    Running  0         9m44s

==> v1/Service
NAME       TYPE      CLUSTER-IP      EXTERNAL-IP  PORT(S)       AGE
svc-nginx  NodePort  10.104.206.163  <none>       80:31234/TCP  16m

==> v1beta1/Deployment
NAME              READY  UP-TO-DATE  AVAILABLE  AGE
deployment-nginx  3/3    3           3          16m
更新 helm
我们将 values.yaml 里的 tag 改为 v2:
image:
  repository: hub.xixihaha.com/library/mynginx
  tag: v2
进行更新:
[root@k8s-master01 myHelm]# helm upgrade looming-seagull .
Release "looming-seagull" has been upgraded. Happy Helming!
LAST DEPLOYED: Sat Apr 11 17:59:39 2020
NAMESPACE: default
STATUS: DEPLOYED

RESOURCES:
==> v1/Pod(related)
NAME                               READY  STATUS       RESTARTS  AGE
deployment-nginx-6fd64dcb5-947kx   0/1    Pending      0         1s
deployment-nginx-6fd64dcb5-pz58p   0/1    Pending      0         1s
deployment-nginx-7796b9c74d-ds7vb  1/1    Running      0         6m25s
deployment-nginx-7796b9c74d-lsr8c  1/1    Running      0         6m25s
deployment-nginx-7796b9c74d-tkdcm  1/1    Terminating  0         6m25s

==> v1/Service
NAME       TYPE      CLUSTER-IP      EXTERNAL-IP  PORT(S)       AGE
svc-nginx  NodePort  10.104.206.163  <none>       80:31234/TCP  6m25s

==> v1beta1/Deployment
NAME              READY  UP-TO-DATE  AVAILABLE  AGE
deployment-nginx  2/3    1           2          6m25s
然后查看 helm:
[root@k8s-master01 myHelm]# helm list
NAME            	REVISION	UPDATED                 	STATUS  	CHART        	APP VERSION	NAMESPACE
looming-seagull 	2       	Sat Apr 11 17:59:39 2020	DEPLOYED	my-template-1	           	default
可以看到,其中的 REVISION 字段变为了 2,这个是 helm 的历史纪录版本,我们可以根据该版本号进行回滚。
删除 helm
[root@k8s-master01 myHelm]# helm delete modest-crocodile
release "modest-crocodile" deleted
注意:以上这种删除方式并没有真正的删除 helm,只是标记为删除而已,依然可以使用 helm ls --deleted 查看和被回滚。
如果要真正删除 helm 以及相关资源,需要加上一个参数:
helm delete --purge modest-crocodile
查看 helm 历史记录
[root@k8s-master01 myHelm]# helm history looming-seagull
REVISION	UPDATED                 	STATUS    	CHART        	DESCRIPTION
1       	Sat Apr 11 17:53:15 2020	SUPERSEDED	my-template-1	Install complete
2       	Sat Apr 11 17:59:39 2020	DEPLOYED  	my-template-1	Upgrade complete
回滚 helm
回滚到某个指定的版本 helm rollback release-name reversion-number:
[root@k8s-master01 myHelm]# helm ls
NAME           	REVISION	UPDATED                 	STATUS  	CHART        	APP VERSION	NAMESPACE
looming-seagull	3       	Sat Apr 11 18:24:53 2020	DEPLOYED	my-template-1	           	default
[root@k8s-master01 myHelm]# helm history looming-seagull
REVISION	UPDATED                 	STATUS    	CHART        	DESCRIPTION
1       	Sat Apr 11 17:53:15 2020	SUPERSEDED	my-template-1	Install complete
2       	Sat Apr 11 17:59:39 2020	SUPERSEDED	my-template-1	Upgrade complete
3       	Sat Apr 11 18:24:53 2020	DEPLOYED  	my-template-1	Upgrade complete
[root@k8s-master01 myHelm]# helm rollback looming-seagull 2
Rollback was a success! Happy Helming!
注意:被标记为删除的 helm 也能够进行回滚。
尝试创建 dry-run
我们编写好 helm 文件之后,想在实际执行前检验一下这些文件是否正确,那么可以使用 --dry-run 参数,预先执行一次,但是并没有真正创建相关资源:
[root@k8s-master01 myHelm]# helm install --dry-run .
NAME:   coiling-seahorse
如果文件是正确是,就会返回一个 helm 名称。
-- end --