

本文章需结合上一篇 部署 k8s 集群 ,如果只是想了解如何搭建 harbor 私有仓库,可前往 Docker harbor 私有仓库
环境准备
一台虚拟机 IP 为: 192.168.19.170
设定 harbor 私有仓库域名为:hub.xixihaha.com
安装 docker(查看安装方式)、docker-compose(查看安装方式)。
配置 hosts 域名解析
修改 k8s-master01 、k8s-node01、k8s-node02 以及 harbor 私有仓库虚拟机中的 /etc/hosts :
127.0.0.1   localhost localhost.localdomain localhost4 localhost4.localdomain4
::1         localhost localhost.localdomain localhost6 localhost6.localdomain6
192.168.19.150 k8s-master01
192.168.19.160 k8s-node01
192.168.19.161 k8s-node02
192.168.19.170 hub.xixihaha.com
配置 daemon.json
在每个台机器的 /etc/docker/daemon.json 文件中添加镜像源信任的地址 "insecure-registries": ["https://hub.xixihaha.com"]。
因为 docker 默认使用的是 https 协议访问,所以需要在每台机器的 daemon.json 文件中将 harbor 仓库地址配置进去,告诉 docker 这是一个可以信任的地址。
{
    "exec-opts": ["native.cgroupdriver=systemd"],
    "log-driver": "json-file",
    "log-opts": {
        "max-size": "100m"
    },
    "registry-mirrors": [
        "https://dockerhub.azk8s.cn",
        "https://hub-mirror.c.163.com"
    ],
    "insecure-registries": ["https://hub.xixihaha.com"]
}
因为我们需要使用本地浏览器访问 harbor 仓库,所以还需要配置本地 host 文件:
192.168.19.170 hub.xixihaha.com
安装 harbor
Harbor 有离线安装和在线安装,其需要的文件都可以在 https://github.com/goharbor/harbor/releases 上下载。我们这里选择离线安装,即下载压缩包。
下载完成后将压缩包放入 /usr/local 目录下,并解压:
[root@localhost ~]# cd /usr/local
[root@localhost ~]# ls
harbor-offline-installer-v1.2.0.tgz

[root@localhost ~]# tar -zxvf harbor-offline-installer-v1.2.0.tgz
[root@localhost ~]# ls
harbor  harbor-offline-installer-v1.2.0.tgz

[root@localhost ~]# rm -rf harbor-offline-installer-v1.2.0.tgz
然后我们进入 /usr/local/harbor/ 文件夹,修改 harbor.cfg 文件:
# hostname 修改为仓库地址的域名,即我们配置在 /etc/docker/daemon.json 中的地址
hostname = hub.xixihaha.com

# ui_url_protocol 修改为 https
ui_url_protocol = https

# 这两个属性指定了证书文件的存放地址(可不修改)
ssl_cert = /data/cert/server.crt
ssl_cert_key = /data/cert/server.key
创建 /data/cert 文件夹存放证书文件:
# 生成私钥
openssl genrsa -des3 -out server.key 2048
openssl req -new -key server.key -out server.csr

# 备份私钥
cp server.key server.key.org

# 退掉证书密码(否则 docker 无法使用)
openssl rsa -in server.key.org -out server.key

# 证书签名
openssl x509 -req -days 365 -in server.csr -signkey server.key -out server.crt

# 将所有文件赋予权限
chmod a+x *
上面生成证书时需要注意以下几点:
1、过程中会要求输入密码,简单点就行,必须一致;
2、执行 openssl req -new -key server.key -out server.csr 时需要输入一些信息,可以参考下面:
[root@localhost cert]# openssl req -new -key server.key -out server.csr
# 密码
Enter pass phrase for server.key:
# 国家
Country Name (2 letter code) [XX]:CN
# 省
State or Province Name (full name) []:HN
# 市
Locality Name (eg, city) [Default City]:CS
# 组织名称
Organization Name (eg, company) [Default Company Ltd]:xixihaha
# 组织单位
Organizational Unit Name (eg, section) []:xixihaha
# 域名,这个要与仓库地址一致
Common Name (eg, your name or your server's hostname) []:hub.xixihaha.com
# 邮件
Email Address []:xxxx@qq.com
# 下面的可以直接回车跳过
Please enter the following 'extra' attributes
to be sent with your certificate request
A challenge password []:
An optional company name []:
然后进入 /usr/local/harbor/ 目录中执行 install.sh 启动 harbor:
cd /usr/local/harbor/
./install.sh
启动成功后我们可以使用浏览器访问 hub.xixihaha.com,默认账号密码是 admin/Harbor12345。
仓库测试
在 k8s-master、k8s-node01、k8s-node02 任一节点上执行登录操作,都是可以登录成功的:
[root@k8s-node02 ~]# docker login -uadmin -pHarbor12345 https://hub.xixihaha.com
WARNING! Using --password via the CLI is insecure. Use --password-stdin.
WARNING! Your password will be stored unencrypted in /root/.docker/config.json.
Configure a credential helper to remove this warning. See
https://docs.docker.com/engine/reference/commandline/login/#credentials-store

Login Succeeded
如果要推送镜像到仓库,打 tag 命令和 push 命令可以访问 hub.xixihaha.com 进入默认项目 library 中,点击 推送镜像 按钮查看,如:
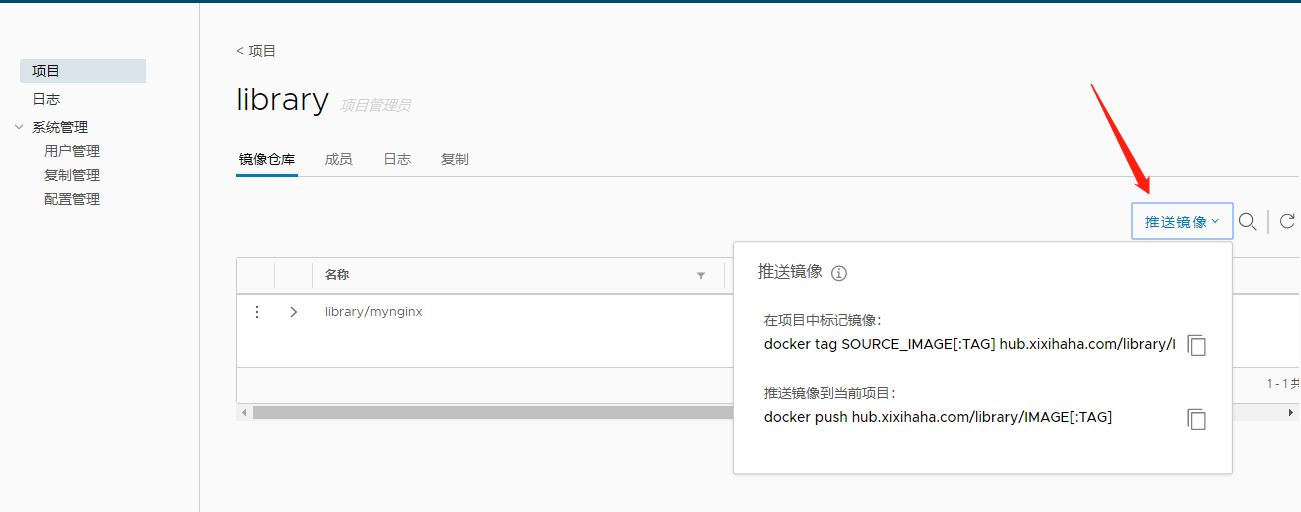
图中的 library/mynginx 镜像是我已经推送上去了的。
-- end --